
***** UPDATE 2021 ******
I wrote a new article to install the Zabbix Version 5.x -> please use the new one.
Synology Zabbix Docker with GUI Version 5.x
***** UPDATE 2021 ******
This manual will help you installing Zabbix Server in one Docker Container on your Synology by using the GUI.
- Install Docker (Package Center)
- Open Docker go to Registry and search for „zabbix-appliance“ the first hit should be: „zabbix/zabbix-appliance“ mark it and click on „Download“ choose the version you want to have. My default is ubuntu-4.4-latest
- Go to the Image section and choose your downloaded template click on „Launch“
- Choose the Container name you want to have and click on „Advanced Settings“
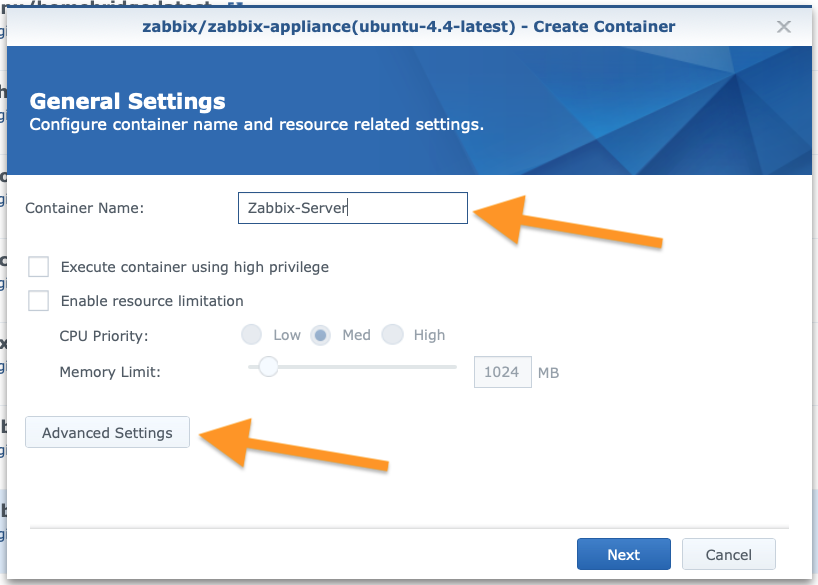
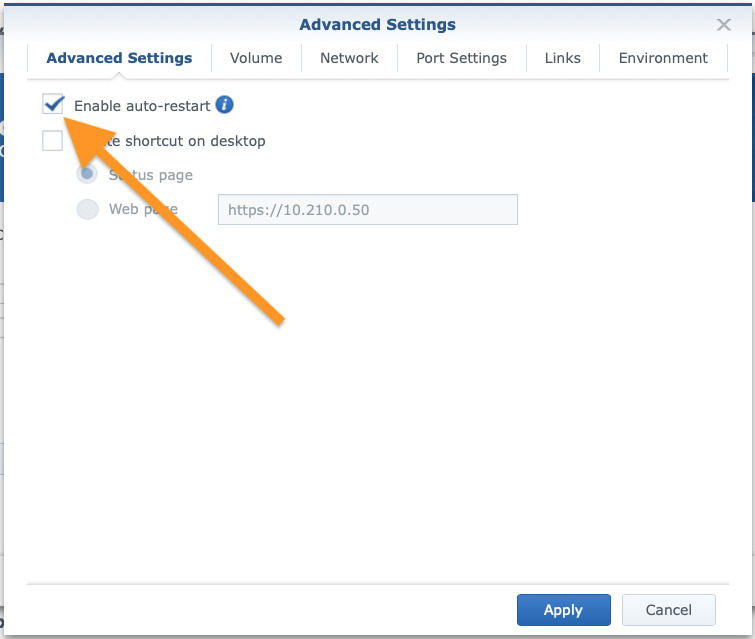
- Enable auto-restart
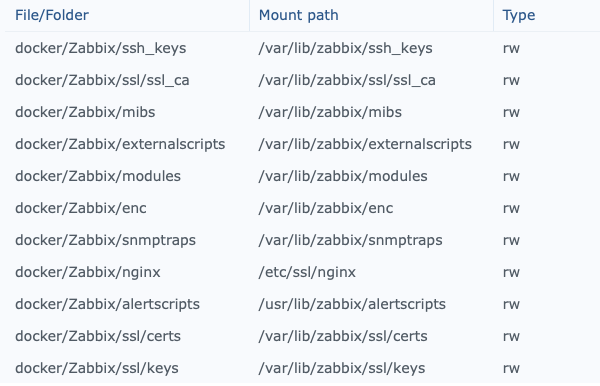
- Create the folder and link them in the section „Volume“
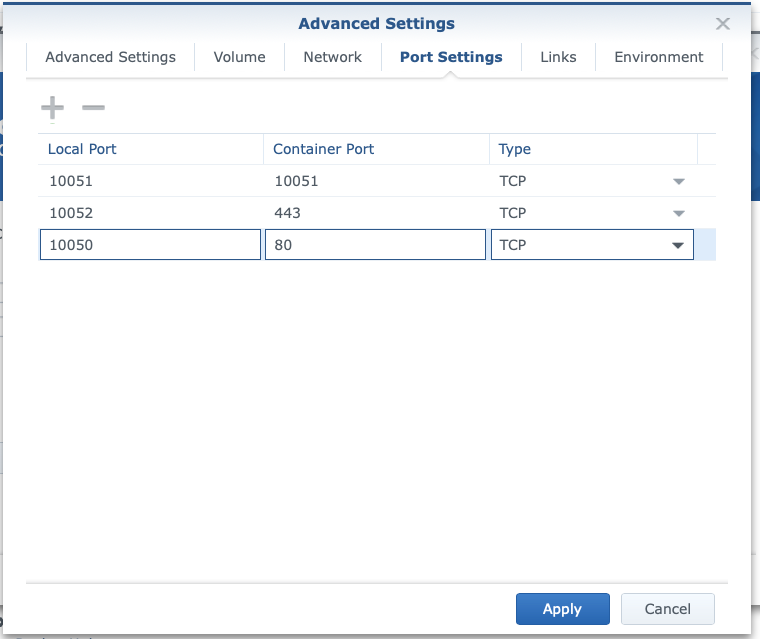
- Set the Ports you want to access the Zabbix installation
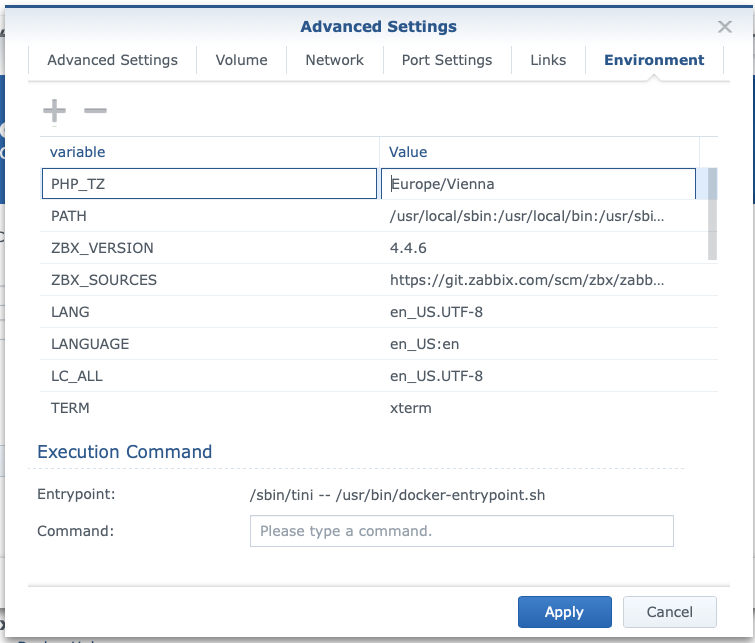
- Add the PHP Time Zone variable and change it to your location. In my case Europe/Vienna
- Apply all settings and the Container will start. This can take a long time. (on my DS918+ more than 30 Minutes)
- Now you can login to your Zabbix Installation using the ports we defined in Step 7. In my case <IP-Adress>:10050
Username: Admin
Passwort: Zabbix
Backup the Database:
The most important settings are all stored in the Database. The easiest and most secure way to save them is to export all the Data at a specific time and store them on the Synology Raid. Please do not forget to follow this help LINK
Hello, do i ned to create the folders all by my self?
Hi Peter,
Yes like i wrote in Point Nr. 6 🙂
OK thx,
It is running fine now.
According to https://registry.hub.docker.com/r/zabbix/zabbix-appliance/ : „Zabbix Docker Appliance image has been decommissioned and will not be available for 3.0.31, 4.0.19, 4.4.7, 5.0.0 and newer releases. Please use a separate Docker image for each component instead of the all-in-one solution.“
This step-by-step post is, however, the only one I’ve found that guides thorough the process of installing Zabbix on a Synology NAS using Docker GUI.
I would really appreciate your help if you could write a similar guide on how to install Zabbix using one of the most recent Docker images. It would require to install mySQL (or another supported DB engine) on other Docker instance and configure them to communicate between each other so that the Zabbix instance stores the data in the mySQL instance.
So far, I have not found such a tutorial nowhere, not have been able to have this configuration running on my own either (Zabbix + MySQL on different containers).
Hi José,
sorry for my late reply. Here is the best solution to your request. 🙂
https://www.schaupper.at/?p=1989
Hi Jose, (sorry for my late reply)
Here is the step-by-step help 🙂
https://www.schaupper.at/?p=2056
Hi Valentin,
ich bin blutiger Anfänger mit Docker aber habe es Dank Deiner Beschreibung zum Laufen bekommen.
Mein Problem ist die IP-Adresse!
Meine Synology hat die 192.168.1.210.
Kann aber die zabbix Seite nicht mit dem Port 10050 aufrufen.
Unter bash zeigt er mit die von Docker installierte 172.17.0.2.
Geht aber auch mit dem Port nicht.
Was mache ich falsch?
Hallo Michael
Welche Ports hast du in den Port Settings eingerichtet?
Wenn du dort auch die 10050 auf 80 bzw. die 10052 auf 443 mappst, solltest du über 192.168.1.210:10050 dich einloggen können. Was bekommst du für einen Fehler?
Viele liebe Grüße!
Valentin
Hallo Valentin,
perfekt, danke hat jetzt funktioniert.
Vielen Dank!