
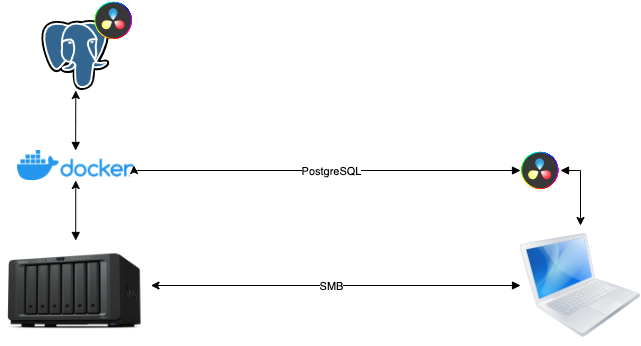
Using a Synology as network attached Share Storage is the way for small and medium production companies for working together. With some hacks you can speed up your installation to nearly 1000 MB/s per connected Client. But in the past it has always been a mess to install a Postgres Database Server direct on the system, because the Synology DSM is using the Port 5432 by itself. I tried a lot with virtual machine workflows but you always have to maintain more systems than you want. With this target in my mind I tried to get a solution by using Docker. This is running native on the system and will bring you the best performance. For the final result I used „macvlan“ as network driver to get an (host separated) own network address for the container.
Essential items list
Things you have to know before you try it yourself.
– one free IP address where you put your Postgres Server
– your network config
– SSH access to your Synology (turn it on in your System Settings)
– interface network name used by your Synology to connect your home network
my Settings
installed Docker folder: /volume1/docker/
IP Network: 10.210.0.0/20 GW 10.210.0.1
IP for DaVinci Resolve Database Server: 10.210.2.199
Hardware interface my Synology is connected to the home network: ovs_eth1
Installation:
First Step – create folder via GUI
First create following folders in your Shared folder „docker“
– DB_DavinciResolve
and the subfolder
– db in the folder DB_DavinciResolve
– Backup in the folder DB_DavinciResolve
It should look like this if you look in the folder structure via SSH
/volume1/docker/DB_DavinciResolve
/volume1/docker/DB_DavinciResolve/db
/volume1/docker/DB_DavinciResolve/Backup
Second Step – accessing the system via SSH
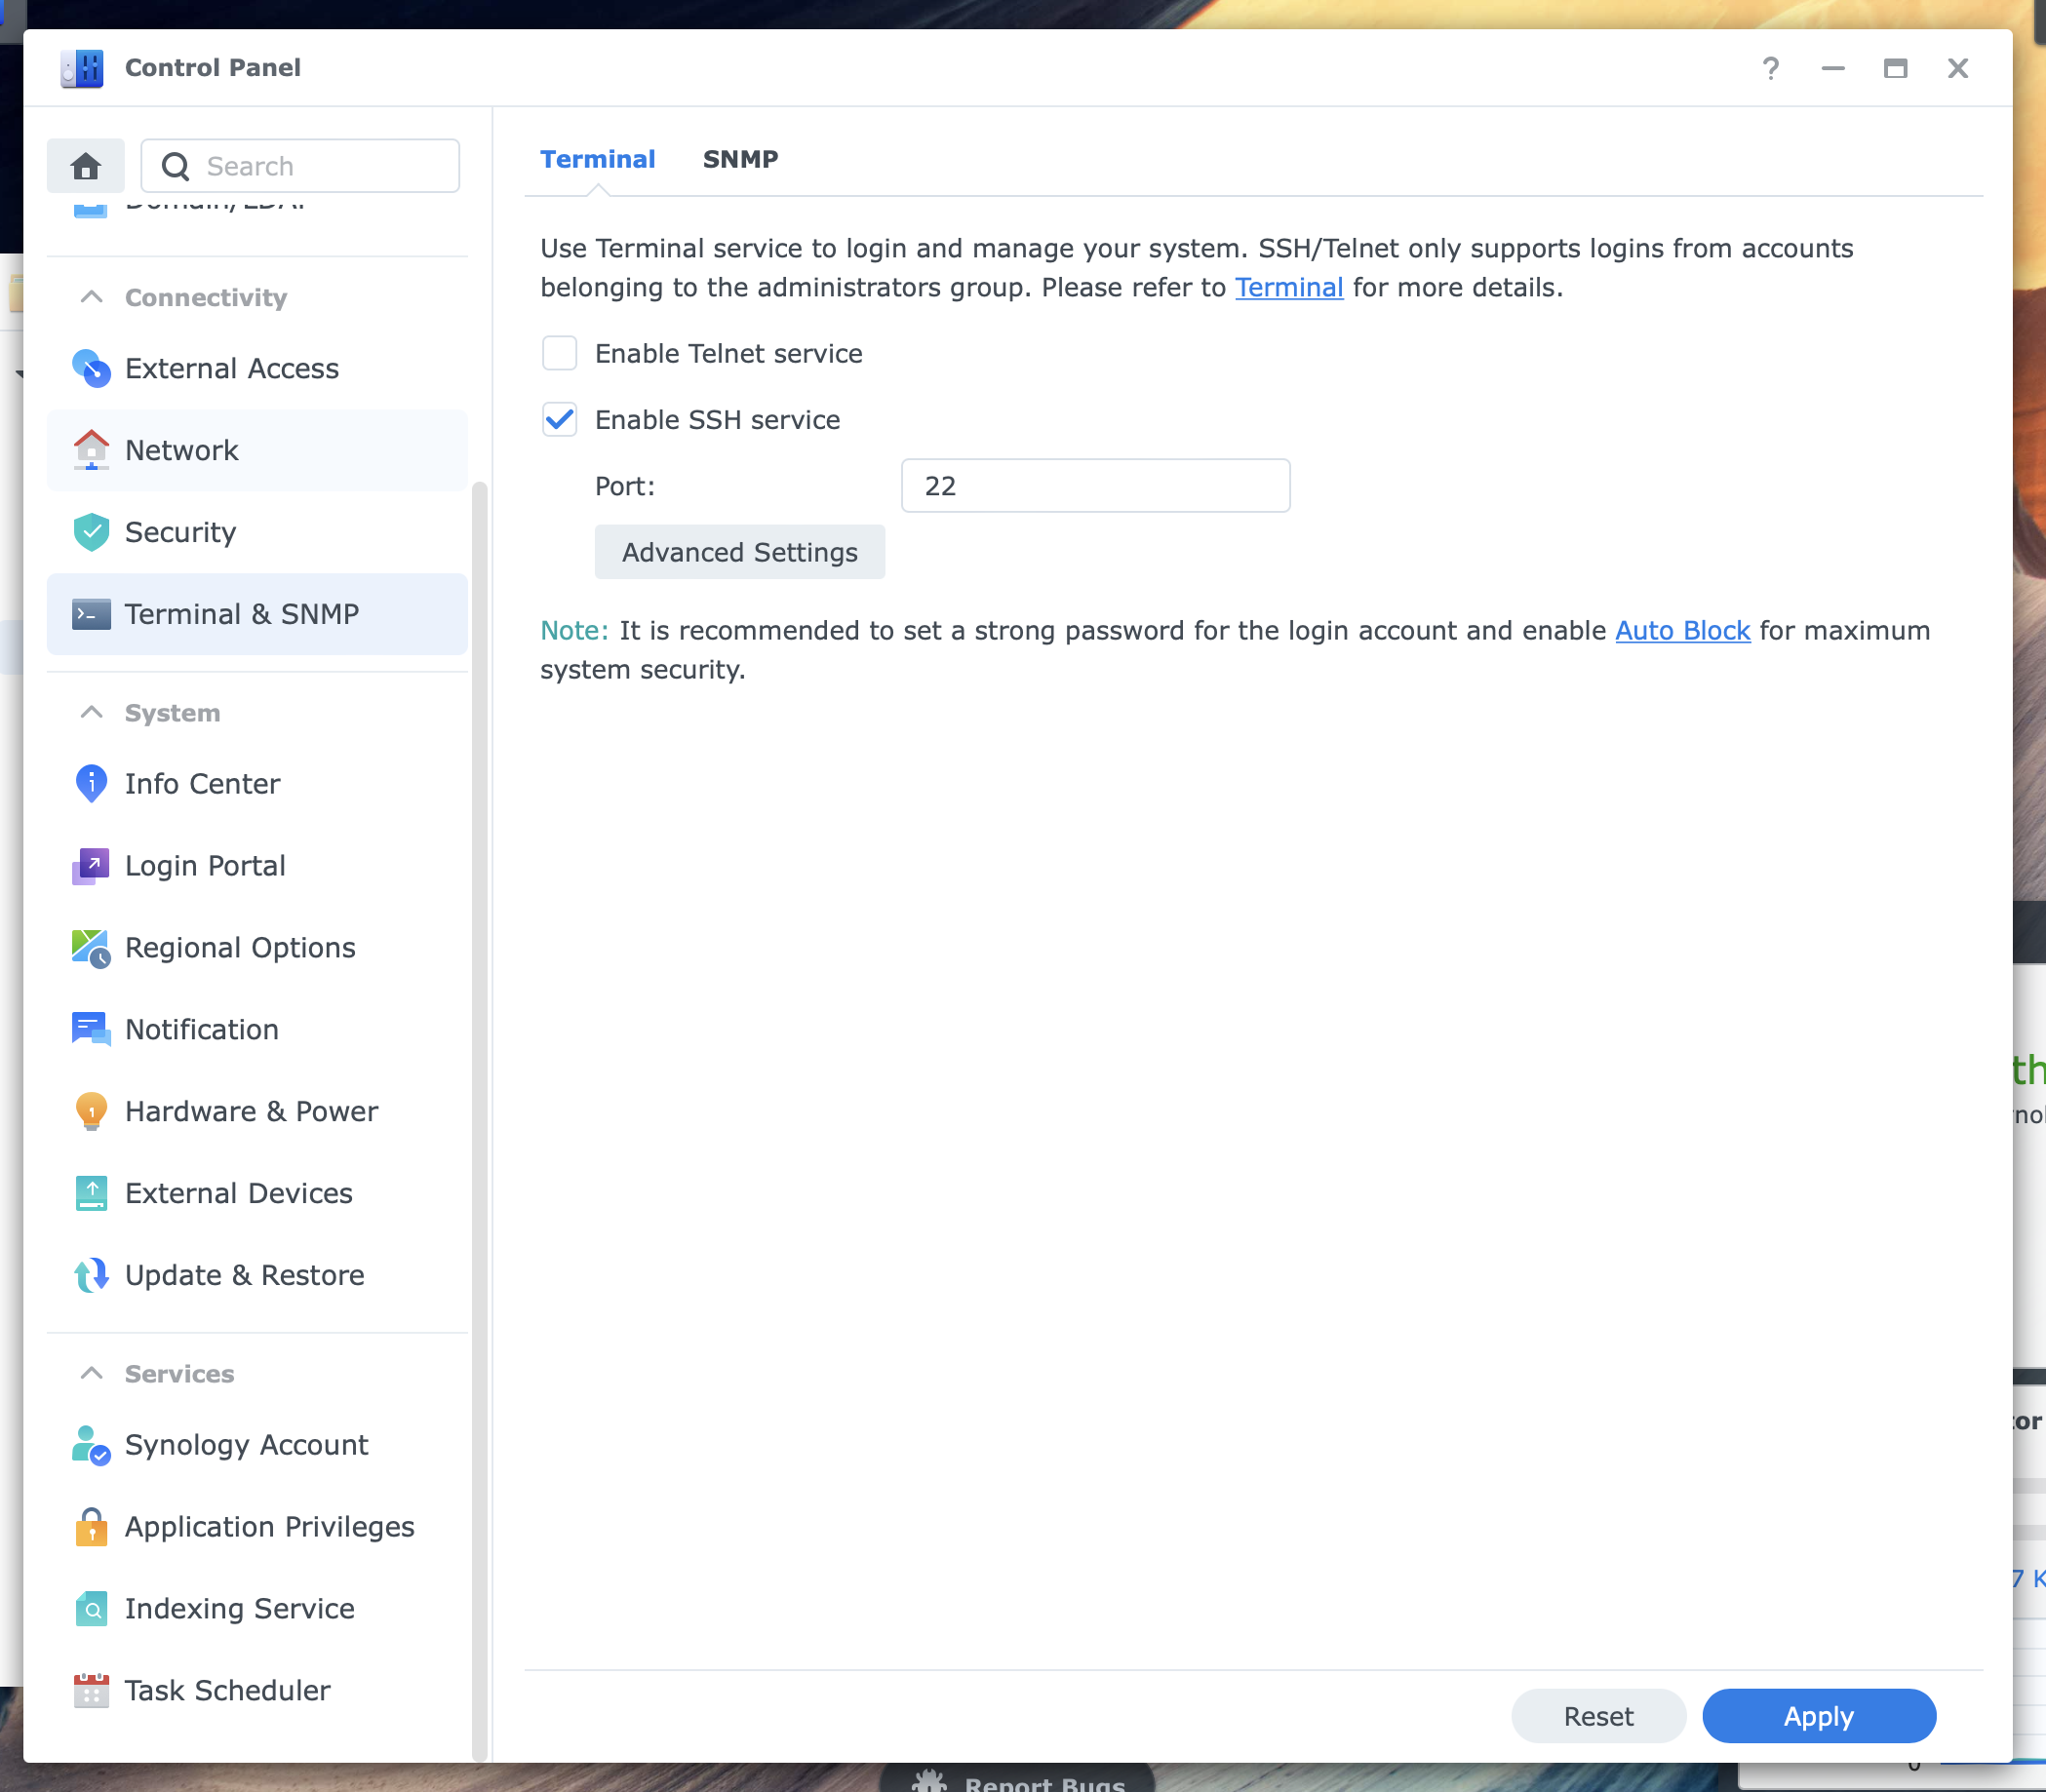
Enable SSH in WebGUI
Login with your Admin into the DSM Management GUI and open the Control Panel, click on „Terminal & SNMP“ and enable SSH.
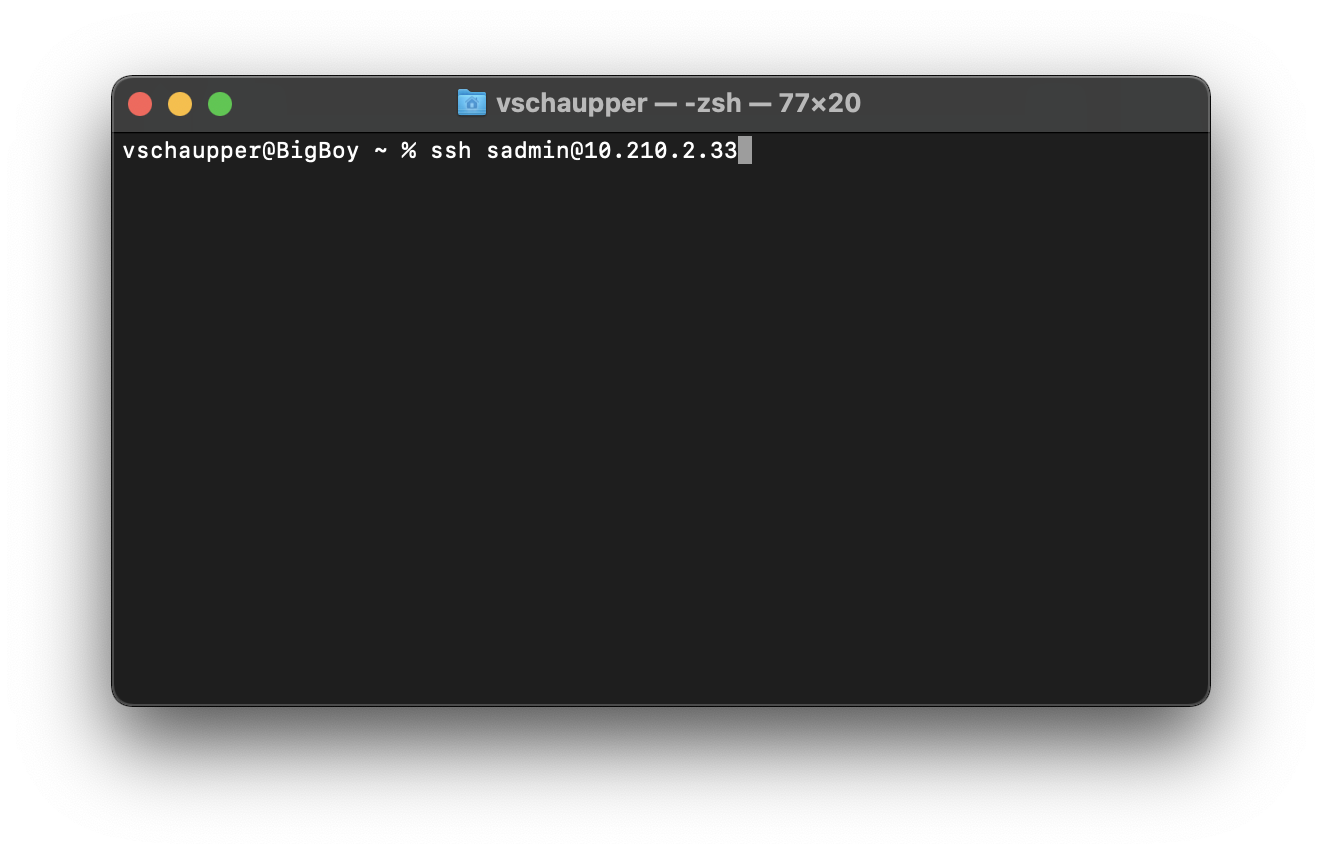
Login via SSH
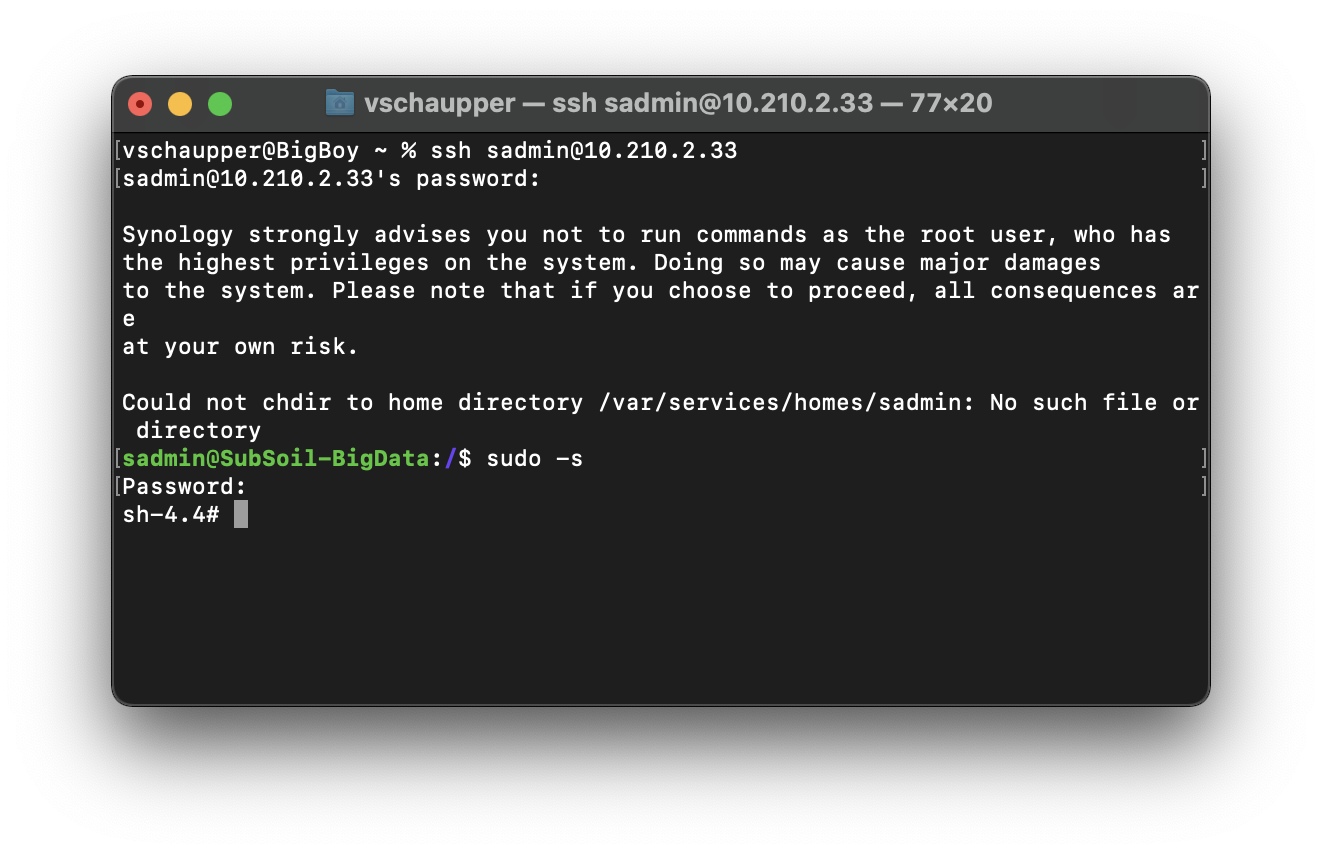
Login via SSH (if you use a MAC just open the Terminal (Applications > Utilitys > Terminal), if you use a Windows device download Putty) by typing
ssh "your_username"@"ipaddress_of_yournas"and press enter, then enter your password (you will not see the digits, just type it and press enter)
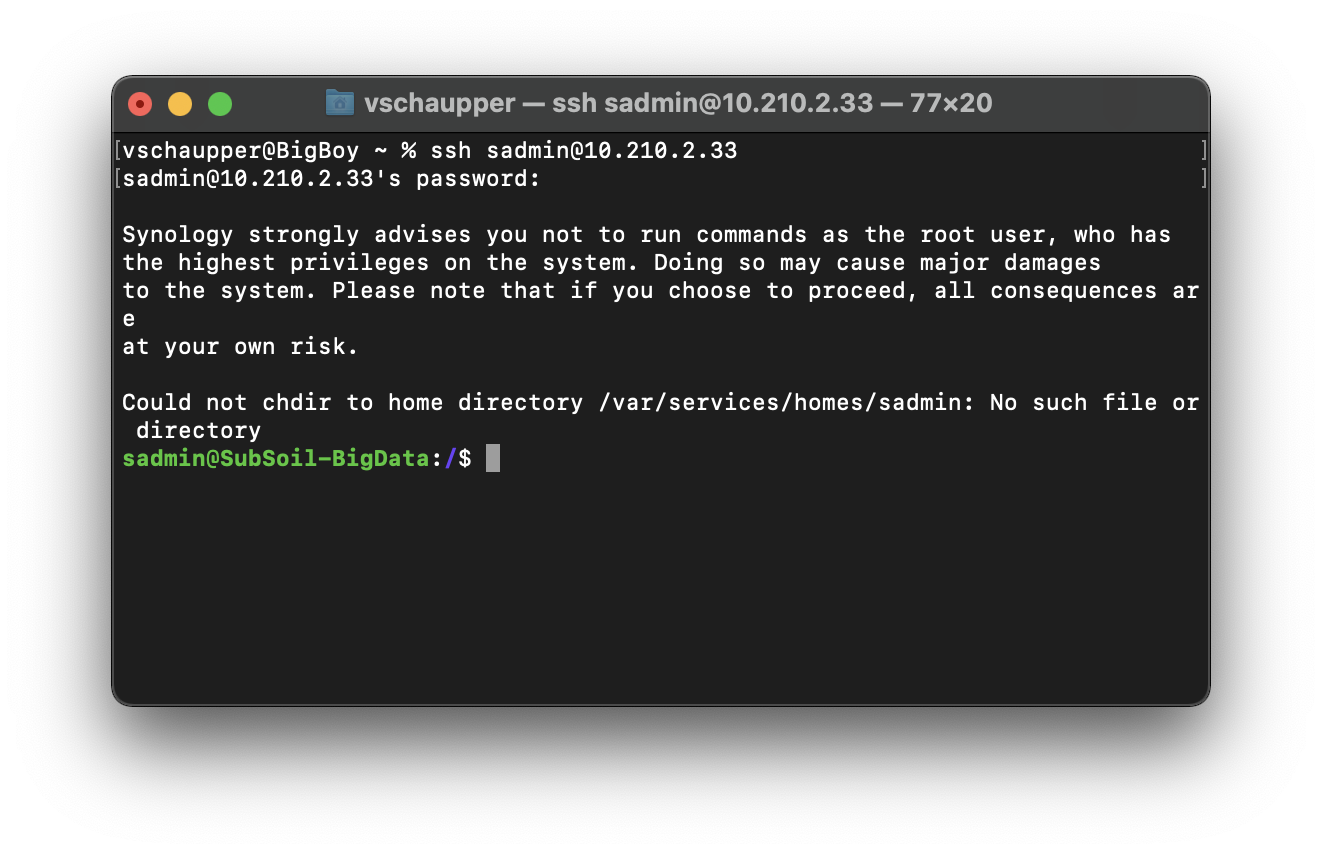
Now we should get the highest privileges we can get in your Synology by typing following
sudo -safter pressing enter you will be asked for your password. Now be careful you are the root of the system and you are able to destroy everything ;). It should look like this:
Third Step – find you network interface name
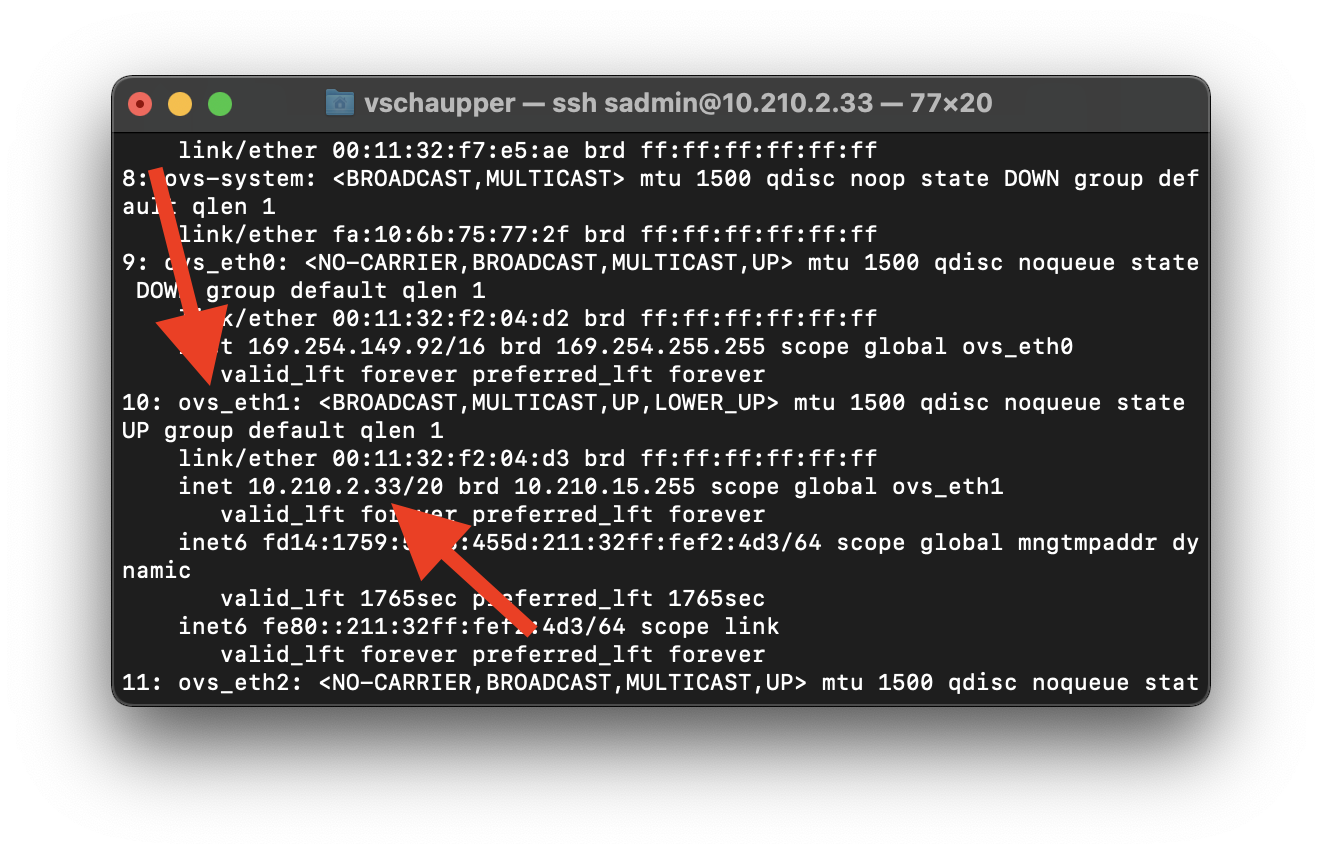
type now, and press enter
ip addryou will get a long list (depending how many interfaces you use), search for the ip range you use in your network and when you find it mark down the name of the interface. In my case I am using the 10.210.2.33 address so my interface name is ova_eth1.
Fourth Step – create docker-compose file
We now want to go to our in the first step created folder DB_DavinciResolve and we can do this by typing following in the terminal window:
cd /volume1/docker/DB_DavinciResolveNow you can create a docker-compose.yml file by typing
vi docker-compose.ymlPress the key „i“ (for insert) and copy following text into the file
version: '3.6'

services:
  postgres:
    container_name: DavinciResolve_Schaupper_at
    image: postgres:9.5.4
    restart: always
    ports:
      - "5432:5432"
    environment:
      POSTGRES_USER: postgres
      POSTGRES_PASSWORD: DaVinci
    volumes:
      - /volume1/docker/DB_DavinciResolve/db:/var/lib/postgresql/data
    networks:
      intranet:
        ipv4_address: 10.210.2.199

networks:
  intranet:
    name: intranet
    driver: macvlan
    driver_opts:
      parent: ovs_eth1
    ipam:
      config:
        - subnet: "10.210.0.0/20"
          gateway: "10.210.0.1"
Change following settings by navigating with the arrow keys
– ipv4_address: 10.210.2.199
– subnet: „10.210.0.0/20“
– gateway: „10.210.0.1“
– parent: ovs_eth1
with your parameters
Press „ESC“ and write „wq“ and press Enter
Fifth Step – create Container
Now start your container with:
docker-compose up -dand you are done. You can logout from the terminal session by closing the window and check in your Docker APP in the Synology DSM GUI if everything is running.
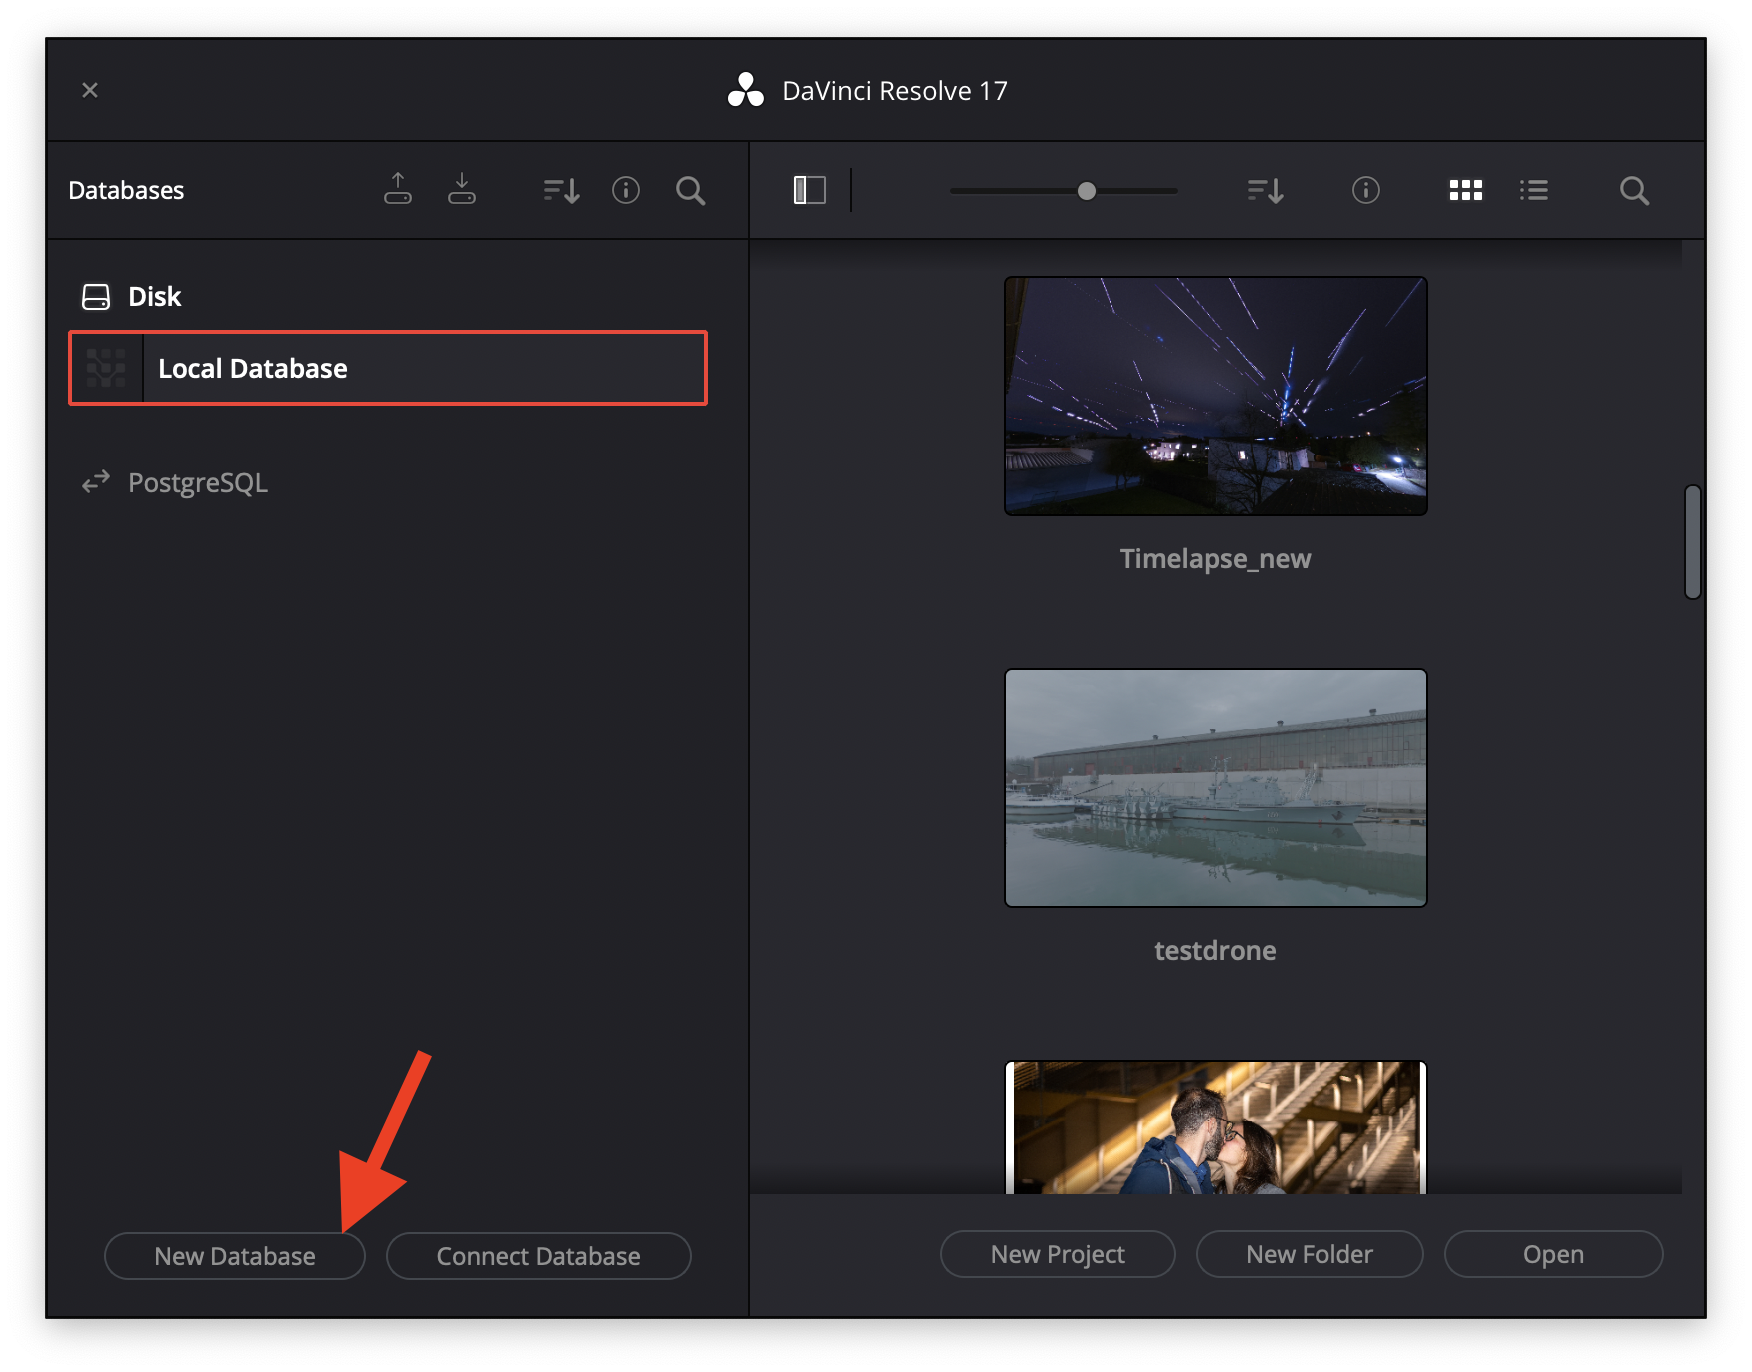
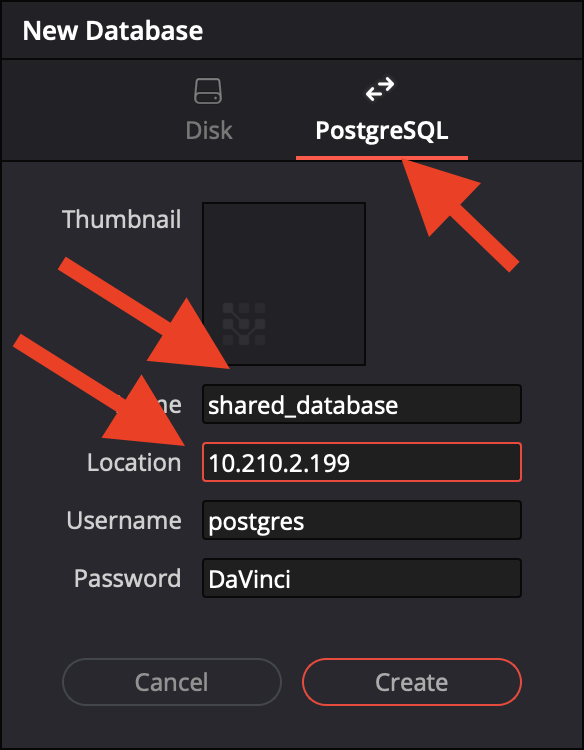
Now try and connect with your DaVinci Resolve Client Application by opening the Projekt Manager and create a new Database
Type in the name of the database and use the same ip address you have chosen before
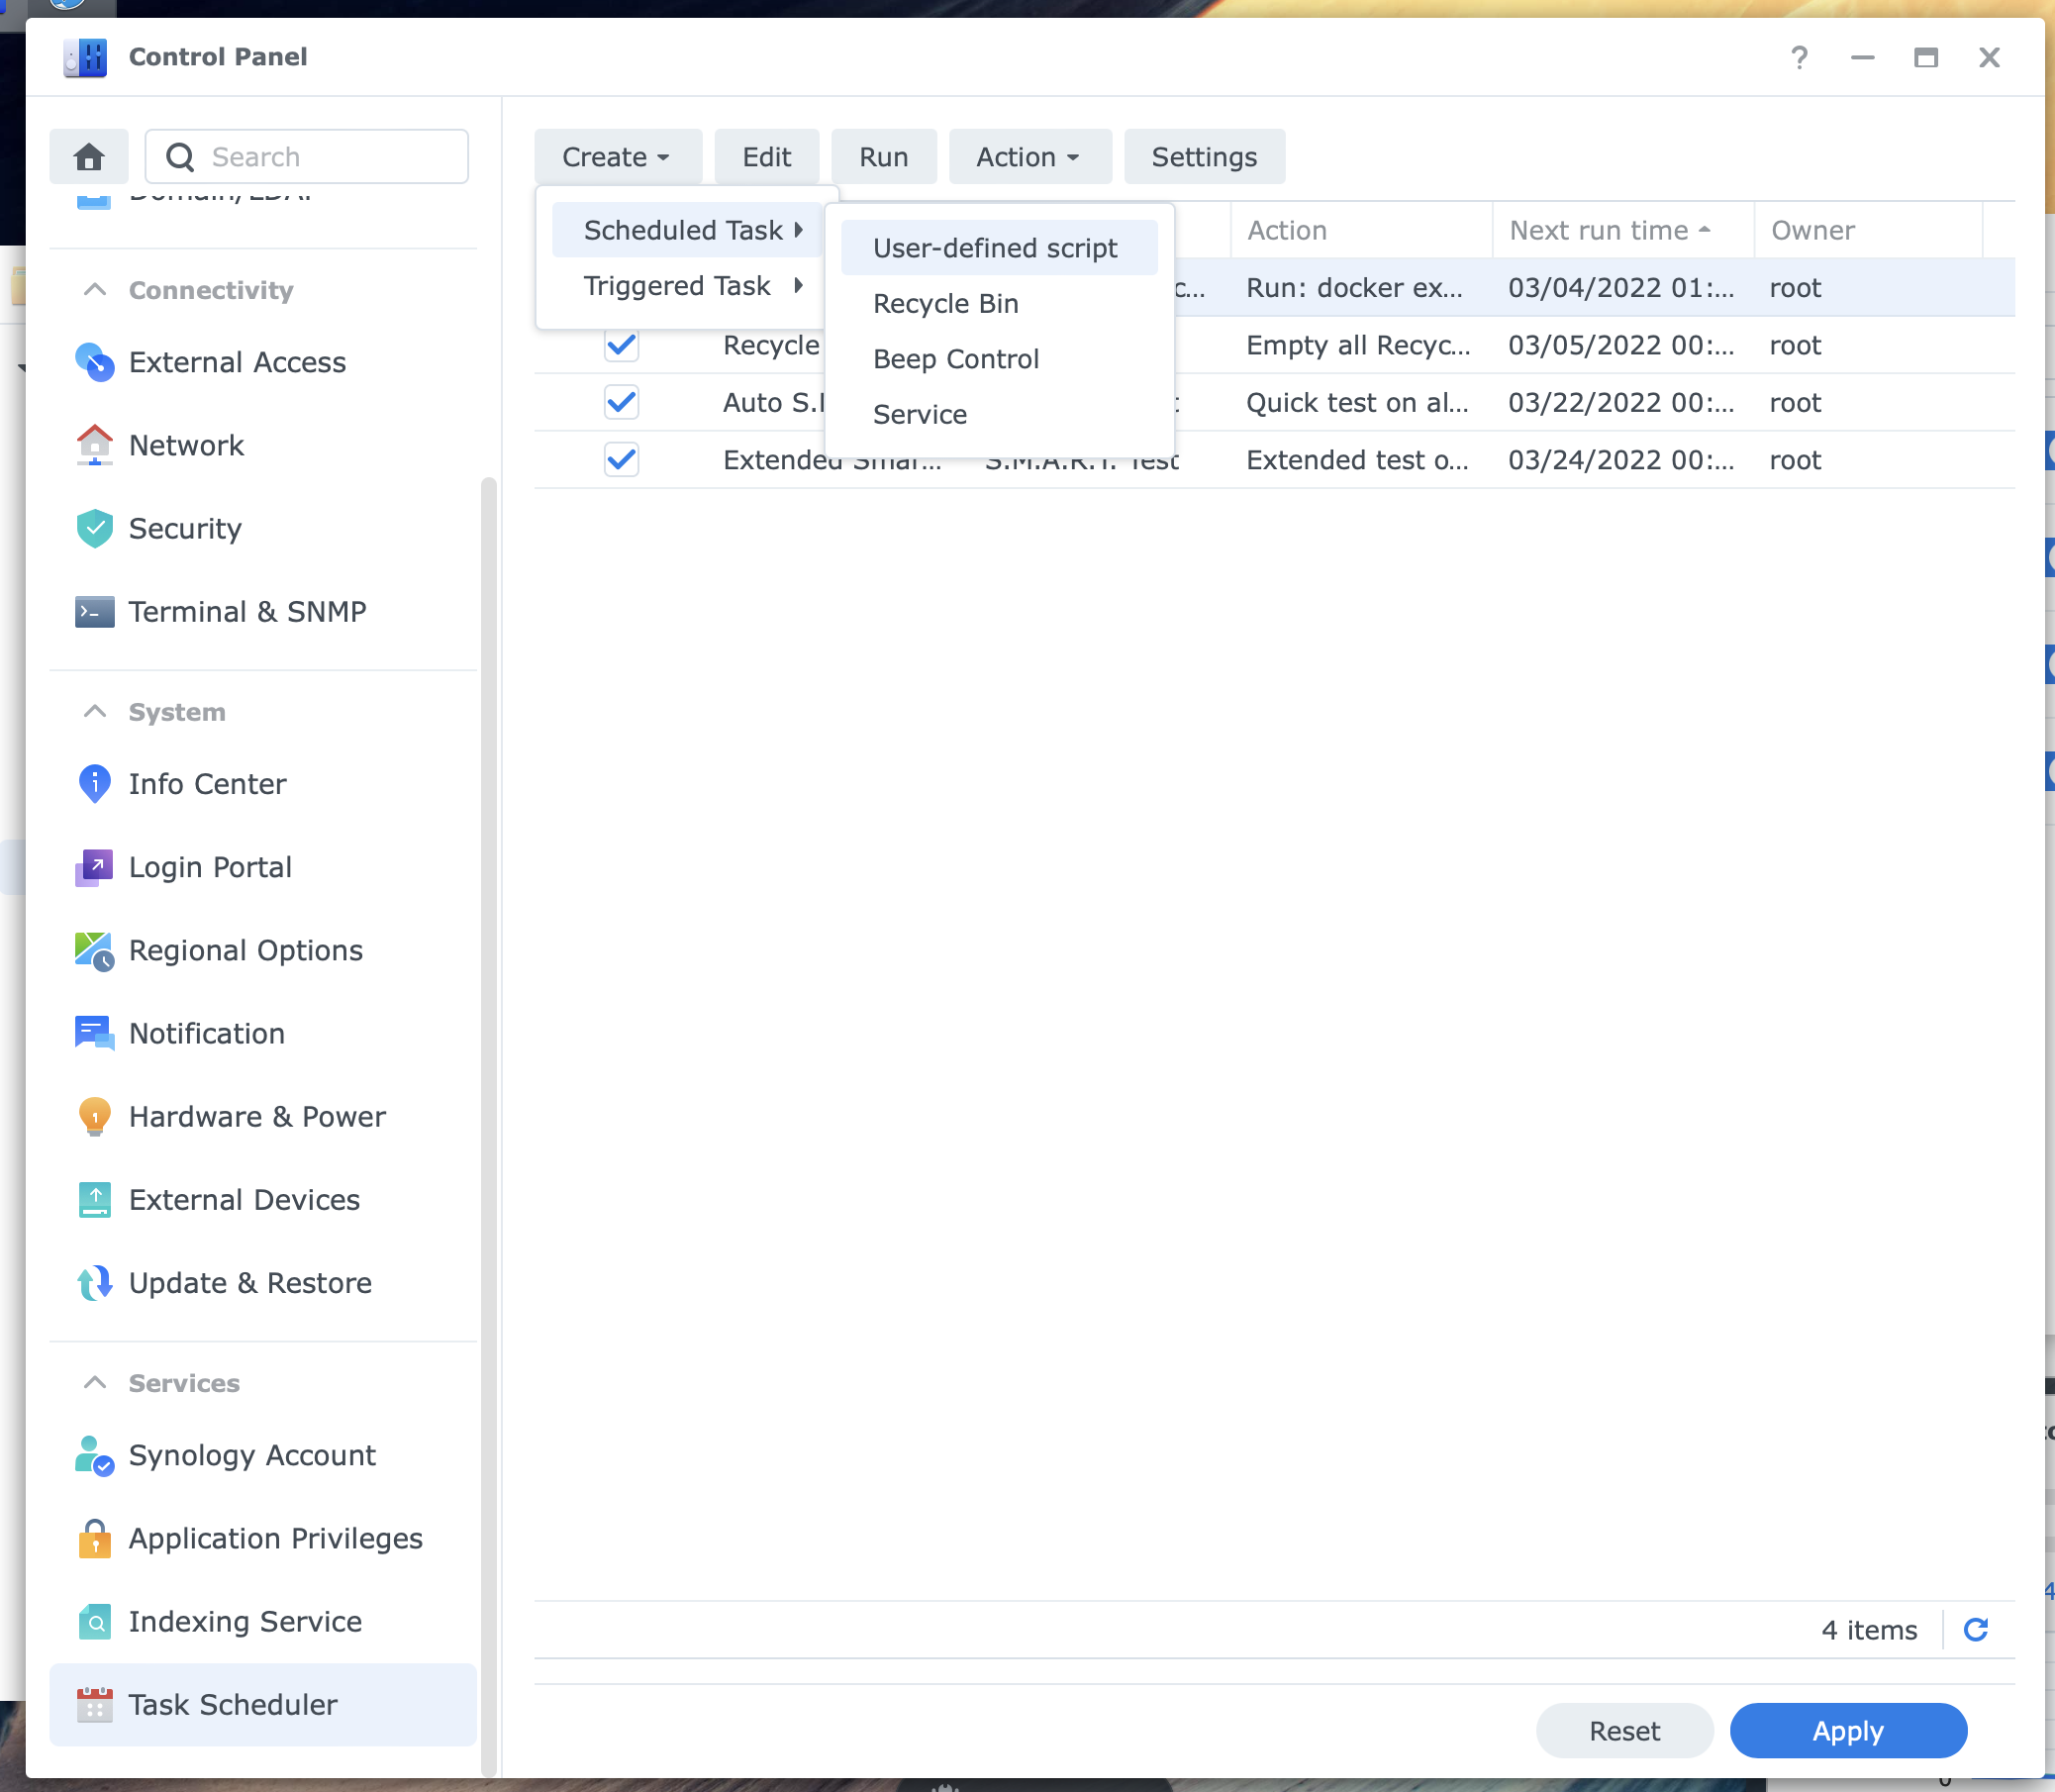
Seventh Step – BACKUP YOUR DATABASE
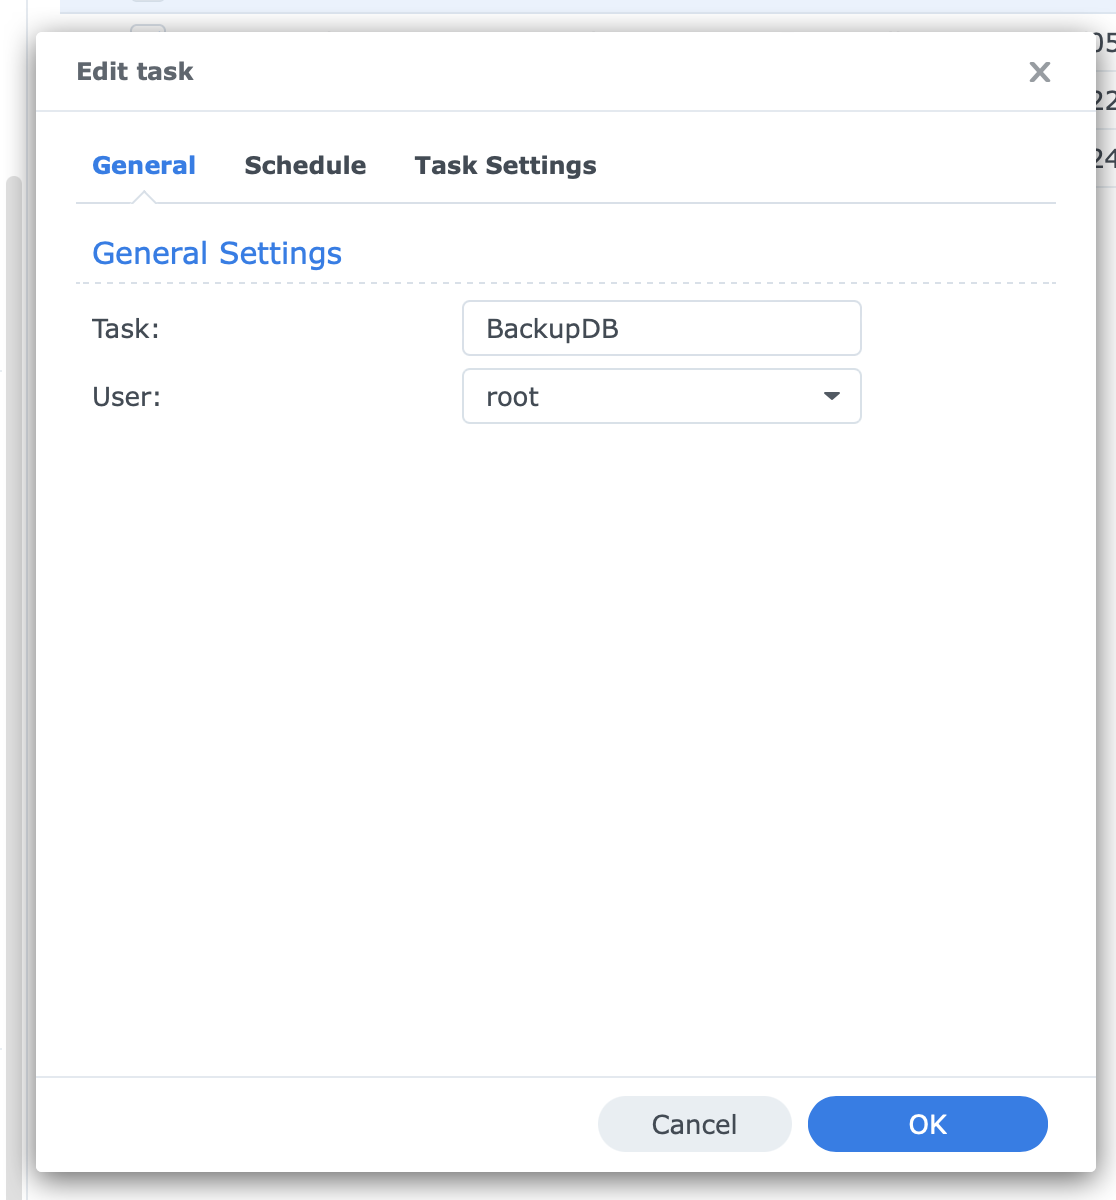
I like to use „Task Scheduler“ in the Control Panel to schedule my backups.

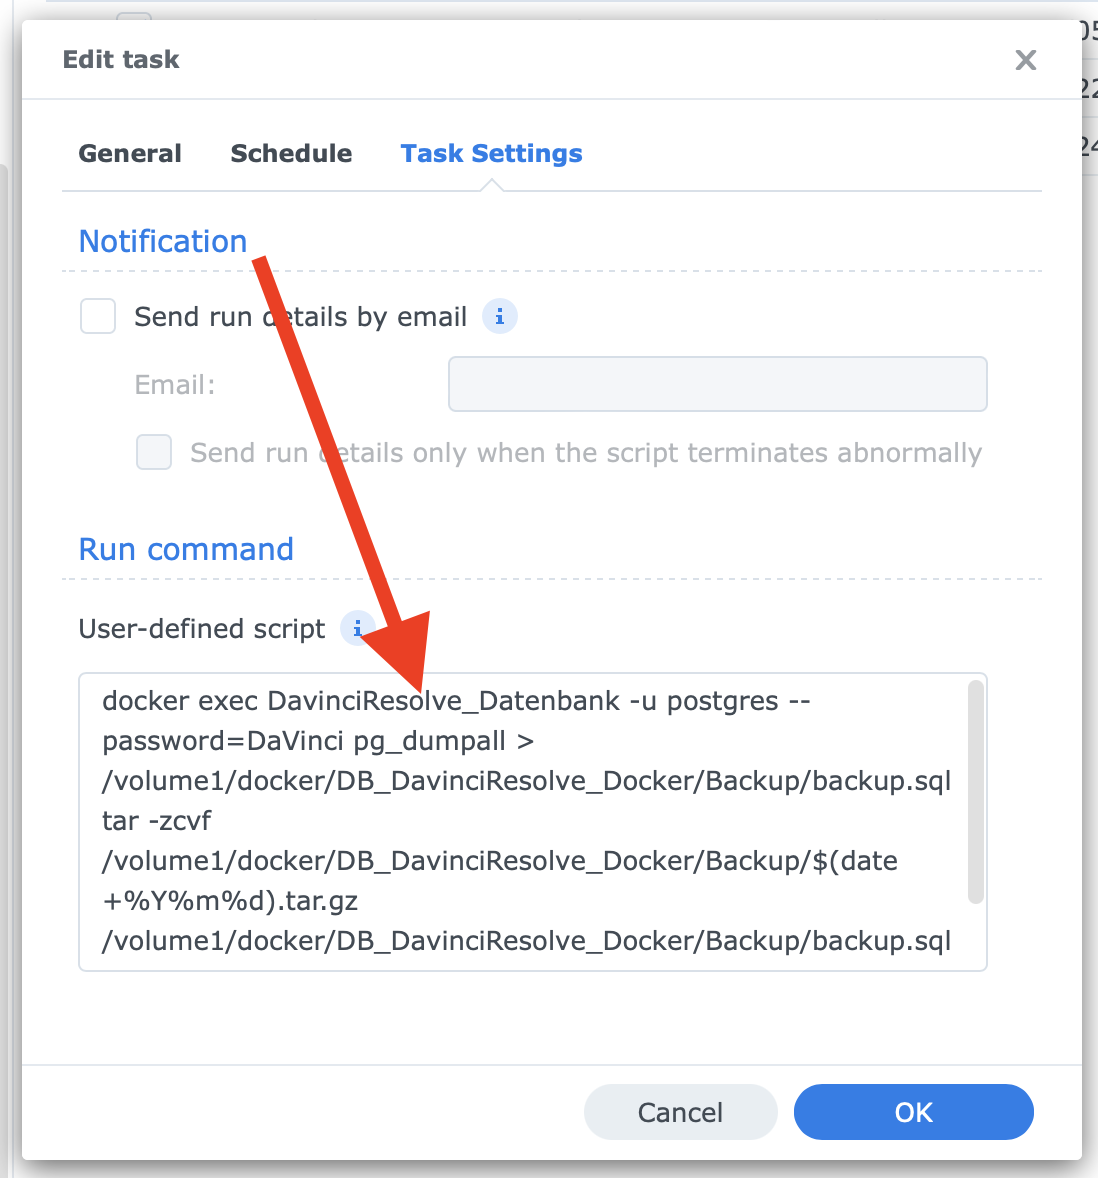
docker exec DavinciResolve_Schaupper_at pg_dumpall -U postgres > /volume1/docker/DB_DavinciResolve/Backup/backup.sql
tar -zcvf /volume1/docker/DB_DavinciResolve/Backup/$(date +%Y%m%d).tar.gz /volume1/docker/DB_DavinciResolve/Backup/backup.sql
rm /volume1/docker/DB_DavinciResolve/Backup/backup.sql
If you get following error:
Creating DavinciResolve_Schaupper_at ... error

ERROR: for DavinciResolve_Schaupper_at  Cannot start service postgres: Bind mount failed: '/volume1/docker/DB_DavinciResolve/db' does not exists

ERROR: for postgres  Cannot start service postgres: Bind mount failed: '/volume1/docker/DB_DavinciResolve/db' does not exists
ERROR: Encountered errors while bringing up the project.
you have to create the folder db in the DB_DavinciResolve folder
Hi very appreciate your tutorial I was looking for something like that since a long time.
I am having some trouble while running the last line in the SSH.
The error message I have its „failed to allocate gateway“ do you have any clues on how I could fix that ?
thanks in advance
Hi Alan,
which line do you mean?
all the best Valentin
Vielen Dank, Herr Schaupper,
Ihre Schritt-für-Schritt-Anleitung war eine große Hilfe, Ich habe zusätzlich zu Putty als Konsole noch pgAdmin 4 eingestzt, um Server und Datenbanken einzurichten, die ich dann in DaVinci Resolve verbunden habe. Der Docker-Container ist ein deutlicher Performance-Gewinn gegenüber der direkten Anbindung der Synology-PostgreSQL-DB. Dies war meine frühere Installation, die seit Resolve Public beta 18 nicht mehr funktionierte.
Über diese Youtube-Adresse hatte ich die alte Installation eingerichtet:
https://www.youtube.com/watch?v=MqJuKu38BsA
Allerdings verlief die Installation nicht reibungslos:
1. keine Verbinmdung von localhost zum Server. Fehler mit pg_hba.conf. Hierzu fand ich einen Fix im Netz.
2. Authentifikationsfehler user=postgres; password=DaVinci, den ich nicht lösen konnte. Ich richtete einen neuen user/password ein und aktualisierte die*.yml-Datei – es klappte, warum auch immer.
Fazit: Insgesamt war die Installation etwas mühsam für einen ungeübten Linux-Konsolen-Nutzer, da ich auch nur halbwegs verstand, welche Funktionen sich hinter den Befehlszeilen verbarg.
Hallo Herr Staude,
Vielen Dank für das Feedback. Ja die Docker DB ist in meinen Augen auch deutlich performanter und flexibler als die locale Installation.
Danke für den Link. Ich hoffe er hilft auch anderen hier noch 🙂
Viele liebe Grüße!
Valentin
Erstmal vielen Dank für die genaue Anleitung.
Ich nutze Davinci Resolve 18 und habe auf meiner Synology nach ihrer Anleitung alles aufgesetzt. Wenn ich jedoch versuche eine neue Project Library hinzuzufügen erhalte ich nur diesen Fehler:
Connection Error
timeout expired QPSQL: Unable to connect
Gibt es dafür einen Grund/ eine Lösung?
Hi Jonathan,
Sorry für die späte Antwort.
Hast du das Problem lösen können?
Viele liebe Grüße!
Valentin
Thank You, worked like a charm!
Note that postgres 14.5 works fine with Resolve 18+.
Hi Laurent,
Thanks, good to know.
all the best
Valentin
Hallo
Ich bekome einen fehler wen ich „ESC“ clicke
Hi Karim,
Wo bekommst du diesen Fehler? Kannst du mir einen Screenshot schicken?
Viele liebe Grüße!
Valentin